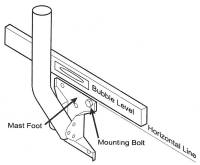
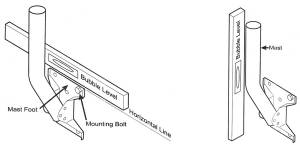
1.Level the Mounting Plate: Before you secure the mounting plate to the location you have chosen, you need to use a bubble level to make sure the top edge of the mounting plate is level (see A)
A
2.Level the Mounting Mast: After the mounting plate has been leveled and secured, use a bubble level to make sure that the mounting mast is plumb. Place bubble level on mast and make sure that mast is level/plumb (see B)
B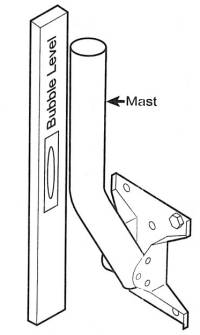
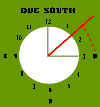
3. Pointing Dish to get Signal: Once dish is mounted and level, find the dish elevation by entering your zip code into the satellite receiver as listed in the instruction manual included in the box. Receiver must be plugged in and connected to a TV set. Set the dish to the elevation listed on the TV and tighten elevation screws on dish. Next, use a compass to find due SOUTH. Imagine the compass as being a clock and due South is pointing straight at 12 o'clock. Due West will point straight at 3 o'clock. You will find the satellite signal somewhere between 1 and 2 o'clock. Start the dish pointing at 3 o'clock and slowly swing the dish toward 12 o'clock. Move the dish in 1/4 - 1/2 inch movements. This will take a while. As you get close to finding the satellite signal the receiver will begin to make a high pitched screeching noise. The signal level meter on the TV will begin to increase.
Basic Installation Instructions
1. Determine Azimuth and Elevation Angle: Follow instructions in manual, enter your zip code in the install/setup screen and the correct Azimuth and Elevation Angle will be displayed. Write these numbers on a piece of paper for use later on in the installation process
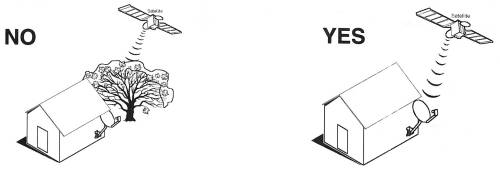
2. Find location to mount Dish: Survey the area where you are thinking about mounting the 18" dish. You need to remember that the dish will point to the South. So find a place to mount the dish and then look to the South, scanning East and West to see if there are any objects that may obstruct a clear view in that direction (see picture)
3. Secure Dish Mount: Secure dish at location you have determined to be free of obstructions using appropriate mounting hardware (i.e.: wood screws, lag bolts, etc.). This will vary depending on the material to which you are attaching the dish. NOTE: always use caution if you are mounting dish on a roof to prevent leaking. Use appropriate sealing materials for this method, consult professional if you are not certain . Roof mounting is only recommended as a last resort option if no other clear area is available. When mounting dish make certain that mounting plate and mounting pole are level (see picture)
4. Place Dish on the Mounting Pole: Loosen bolts on dish mount and slide the dish onto the mounting pole (see picture).
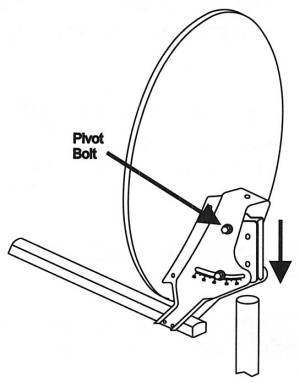
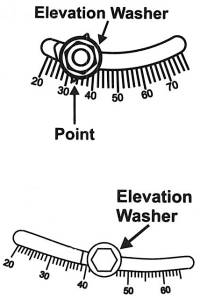
5. Set Elevation Angle: Find the Elevation Angle that you have written on a piece of paper. Loosen dish mount bolts and set the Elevation Angle to the appropriate Elevation Angle as obtained from the Setup screen and entering your zip code, example 45 degrees (see picture). Tighten bolts so that Elevation Angle is locked in place. NOTE: dish should still be able to swing from left to right, all bolts should not be tightened at this time.
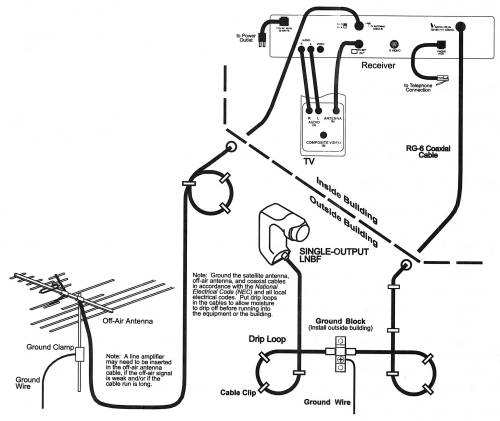
6. Run Wire from House: Using RG6 coax cable, run a cable from the inside of your home, where the satellite receiver is located, to where the dish has been mounted outside
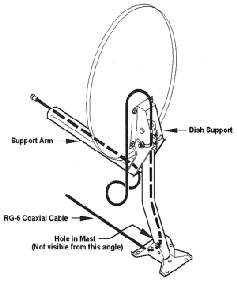
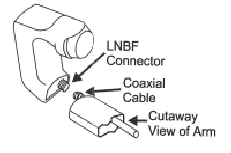
7. Wiring the Dish: Run wire up through bottom of mounting pole and then through the arm that is located on the from of the dish. Leave enough excess cable sticking out of arm so that proper connections can be made in future steps (see picture).
8. Install LNBF on Dish Arm: Make sure that the RG6 coax cable that is sticking out of the dish arm has a threaded connector on the end of the cable. Screw this connector onto the threaded input of the LNBF (see picture). Secure the LNBF to the dish arm using the screw that was included with the LNBF. Connect the other end of satellite cable to the back of satellite receive where it is marked "satellite input" . Connect a phone line from the back of the satellite receiver to a phone outlet in your home. Use the phone coupler to plug both the phone line and satellite phone line into the same outlet.
9. Locate the Satellite: Before trying to tune in the dish and begin receiving satellite signal you should try to get a rough idea of where the satellite is located in the sky. Using a compass find North, so that the needle of compass is pointing directly North/South. Using the Azimuth that was earlier written on the piece of paper, look at this same number on the compass dial. EXAMPLE: if Azimuth is 205 degrees, then with the compass needle still pointing directly North/South, find where the 205 degree mark is pointing ( see picture A). While looking in the approximate direction of the Azimuth angle (205 degrees), look upwards into the sky at the Elevation Angle that is written on the piece of paper, example: 45 degrees (see picture B). This is approximately where you will find the satellite in the sky. This is where you should point the dish before you begin to fine tune the dish and locate satellite signal.
A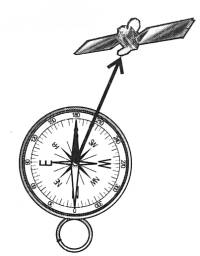
B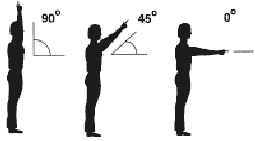
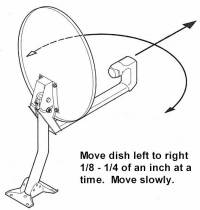
10. Fine Tuning to Receive Signal: Follow the instruction manual to set your satellite receiver on the Signal Strength Meter screen. You may need another person to help you with this part of the tuning process. With the dish pointing in the general direction of the satellite, as in step 9, begin moving the dish slowly to the left or right. NOTE: only move the dish in 1/8 to 1/4 of an inch movements at a time. Go very slow and use only tiny movements (see picture). If you move the dish to the right and can't find signal, slowly begin moving the dish to the left. This process will take some time and may be the longest step in the entire installation process. The signal strength meter on the TV set will begin to make a high pitched whining nose once signal has been located. Once signal has been located, keep fine tuning the dish until the maximum strength signal has been obtained. Any signal strength over 75 will provide a picture on your TV set. However, try to get as strong a signal as possible to help eliminate "rain fade" caused by a weak signal. Very rarely will a system receive a 100% signal, so any signal in the 80's or 90's is acceptable. Once you have found the strongest possible signal, tighten all bolts on the dish.
11. Basic Wiring Diagram: The diagram below shows the basic wiring configuration for a satellite system connected to a TV and a local antenna.
12. Receiving Satellite Channels: Once signal has been tuned for best strength and the dish bolts have been tightened down, using the satellite system remote control put the satellite receiver on channel 100. You should see the "Preview Channel". Next, call DISH Network at 1-800-333-3474 or DIRECTV at 1-800-347-3288 and tell the operator that you have just installed your satellite system and that you need to activate your programming to begin watching satellite TV. Wait approximately 5 - 10 minutes, staying on channel 100. After 5 - 10 minutes use the satellite system remote control and place the satellite system on channel 140 and ESPN should be on your TV. You are now finished installing your satellite system. If your programming does not come on within 30 minutes call DISH at 1-800-333-3474 or DIRECTV at 1-800-347-3288 and ask the operator for assistance. Or you may call 1-800-225-8876 and techDIRECT will be glad to help.